How to Customize Your Blog Design?
This is the eighth lesson of our Ultimate Gutenberg Editor Learning Course. If you want to get the full educational plan – follow the link and subscribe for the course.
When creating your blog, you will spend most of your time defining the design details and implementing them into the website. The color of the background and the titles, fonts, pictures, page structure will demand attention. If you are the kind of person who wastes hours choosing which color of socks to buy (like me), you will probably need the help of a professional designer.
Gutenberg Editor is a great tool. If you know how to use it, you will be able to create sites faster (if you have some problems with it, check out this tutorial). But the problem is, Gutenberg Editor will help you to build only the content area. The design of the rest of the blog pages is made in the customization window. In general, the interface is understandable and clear, but I guess it will still be easier if I’d describe you the main points.
Blog customization
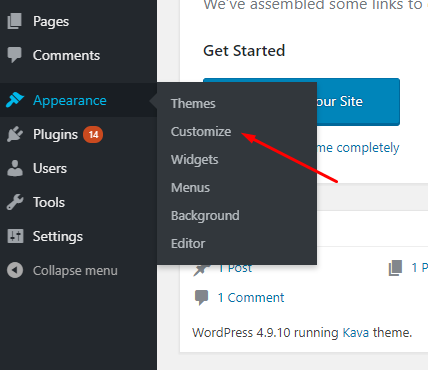
To open the customization window, you have to enter your WordPress website’s dashboard and click Appearance > Customize. By the way, the drop-down menu you see after hovering over the Appearance tab also contains the Background item. If you hit it, you will also get to the customization window but to the background setting tab. I strongly recommend you not to click the Editor item. It will lead you to the theme’s .css code file and if you are not 100% sure you know what you are doing, just don’t open it.
In the customization window there is a menu placed to the left, and the blog’s page view. The page is clickable and all the buttons you placed there will be working and you will be able to go to the other pages or posts for customization without going back to the dashboard. But let’s take a look at every item in the list, step by step.
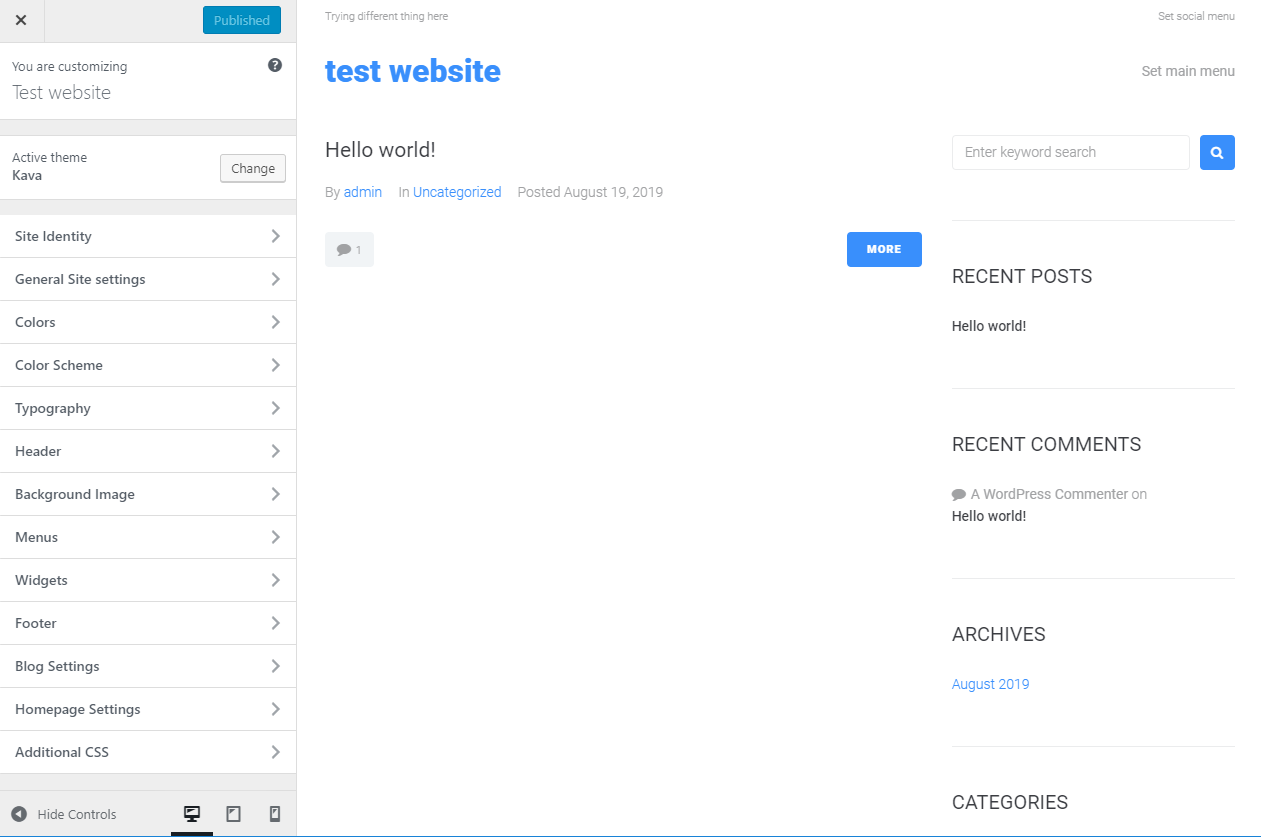
Site Identity
I’ve already mentioned this tab in the WordPress Theme Customization article. Here you can change the options that define the website’s identity—title, tagline, and logo. Besides that, on this tab, you can choose to show the tagline on the top of the page, as well as if to display the “Back to top” button and page preloader.
General Site settings
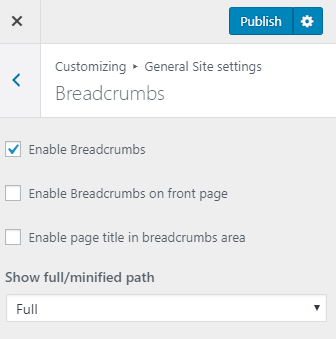
General settings include Favicon, Breadcrumbs, Social links and Page Layout settings. Favicon is a tiny icon that is displayed on the website’s tab in the browser. Breadcrumbs are the chain of links showing the way the user went to get to this page through the other pages of the site. Social links are the buttons that will lead the users to your social media accounts’ pages. In that menu, you can choose whether in the header or footer to display them. Layout settings allow you to defy the width of the sidebar and container type of the content area.

Colors
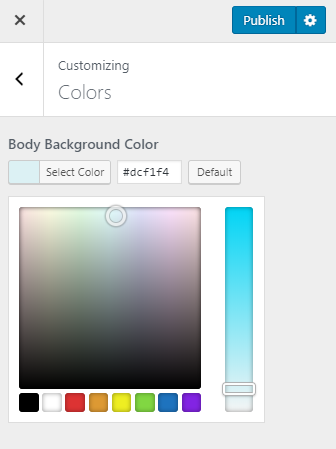
The first variant of the background designing is just painting it in some nice color. This tab will allow you to choose a solid background color and immediately see how it will look like on the site. If you choose to put a background photo there, you won’t have a problem (unless you want to use a picture that has transparent parts). Setting color is just as simple as choosing it from the palette. If you know the hex code of the color you want, you can enter it into the special bar. Hex code is an HTML code that consists of six numbers that define every color as a combination of red, green and blue (#RRGGBB). For example, pure white in this coding will have a #FFFFFF code. The table of colors with codes could be easily found on the internet (for example, htmlcolorcodes.com).
Color Scheme
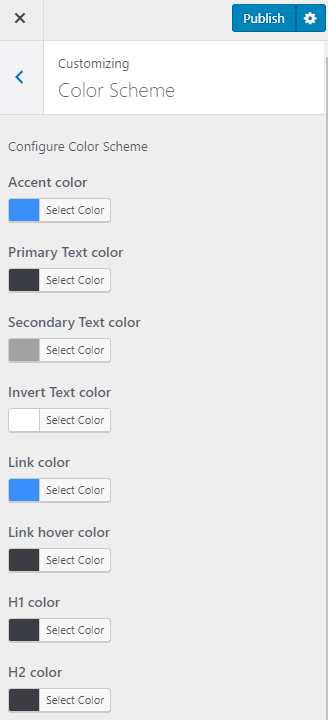
All the colors you use for a website’s design should fit each other. Tables, backgrounds, fonts—the color of every detail is important for the general look. Here in this tab, you can change the color of all the elements except the background, like texts (primary and secondary), links and all types of titles. The way of setting the color is just the same as for the previous tab—you choose the color from the palette or type a hex code.
Typography
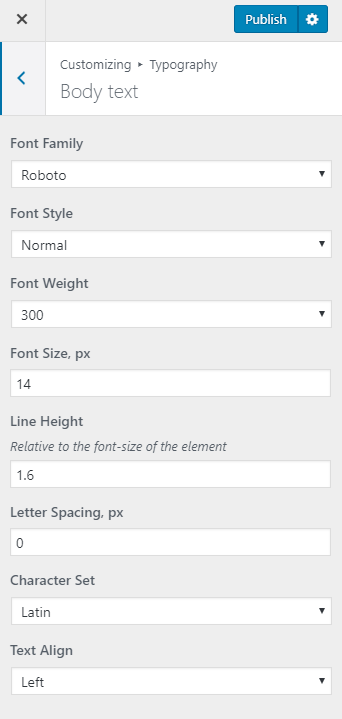
Typefaces you use for the blog are not less important than the colors and pictures, especially since your website specializes in texts. The font not only has to be readable but also pleasant to the eye. It could even help you to express some idea. This tab of the customization window will help you to choose the right font for the text body, headings, logo text, menu, breadcrumbs, and buttons. There are options to change font family, weight, style and size, as well as the line height, letter spacing, character set, and even text align.
Header
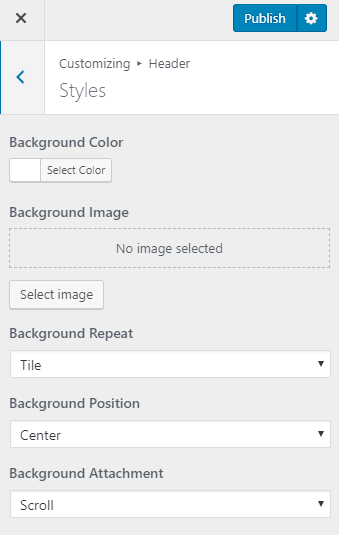
The header of your blog is the first thing a visitor sees. Its style settings like background color or image (with the position and repeat of that image) and attachment (it could be fixed or scrolled) are all placed to the Styles item of the Header tab. The other one, Top Panel, allows you to enable or disable the top panel, which is a narrow panel that appears above the header. Besides that, you can add a search bar there and choose the background color.
Background Image
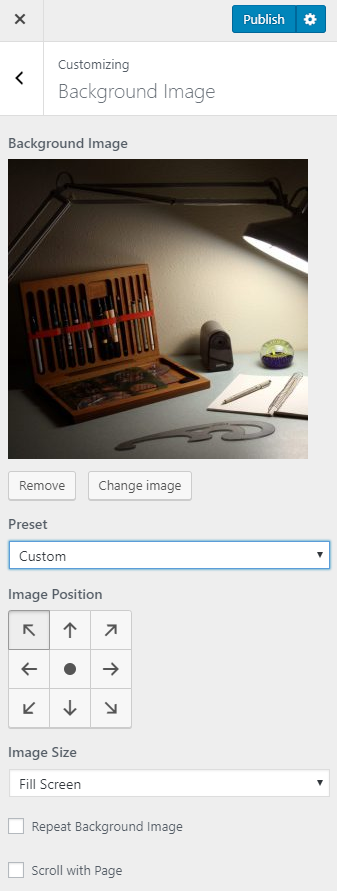
When choosing to go to Appearance > Background, you will land directly on this tab. This tab has an option to add a background image to your blog. After choosing the image you will be able to choose the preset, and if it is not “Fill Screen” you will be able to customize the other settings like image position, size, and scrolling. Anyway, I would recommend you to be careful with the images you choose as a background. If they are too bright and colorful, they will mess the general look of the blog and could annoy users.
Menus
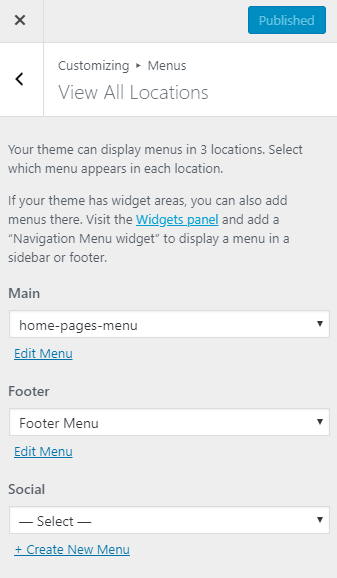
To be able to customize it, you will have to create a menu first (and wordpress theme customization article will show you how). Usually, a template supports about three locations for the menu—header (or main), footer and social. In this tab you will be able to put the menus you create into a specific location or change the menus when they no longer fit your requirements. Besides this tab, menus could be managed in the Menus window of the Appearance tab in the dashboard.
Widgets
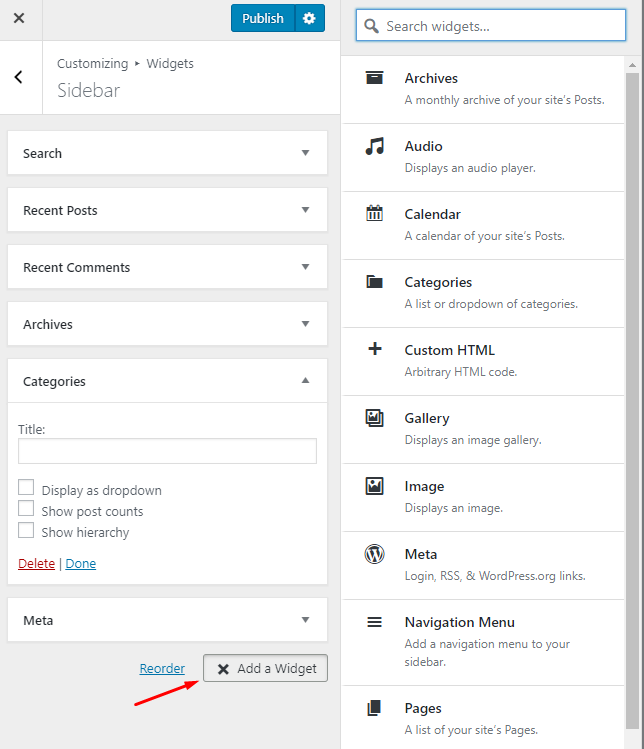
This tab contains the option to set the sidebar widgets. Some themes allow you to place widgets into several sidebars or other locations (but most commonly there is only one sidebar). Default widgets for the sidebar are search bar, recent posts, recent comments, archives, categories, and meta. You can rename, move (just drag it with the pointer and move anywhere) and delete them. Besides that, some of the widgets have additional options. There is a big list of additional widgets you can add. Click the “Add a Widget” button and choose from the list to the right.
Footer
This tab allows you only to change the text shown at the bottom of the page. By default, the text will be a name of the template used for the blog, some copyrights or the date. Take a brief look to the bottom of the page you are currently reading and you will see the text.
Blog Settings
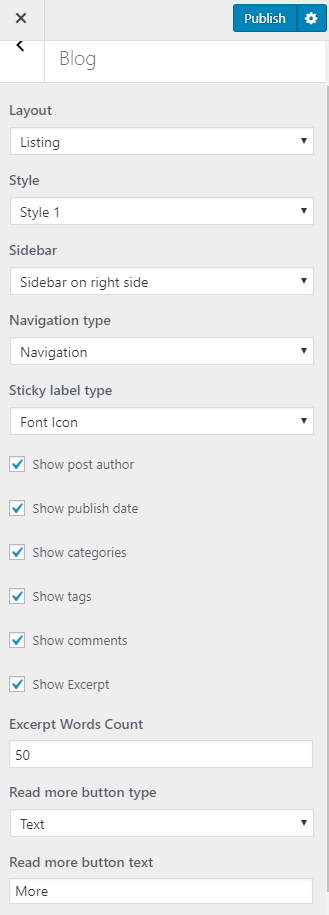
We are talking about blog customization, so this tab is especially important for you. By the way, not every template has this tab available; only those ones created specifically for blogs. It doesn’t mean it is impossible to create a blog website with it; rather, it will be more complicated. Here in this tab, you can choose the layout, style, sidebar location, navigation, and sticky label type.
There is a huge bunch of additional information for every post, like the author, publishing date and the number of comments. In this tab, you can choose whether you want to show them or not. The size of the excerpt and the look of the “Read more” button is set here too. Play a little with those settings to understand what combination best fits your taste.
Homepage Settings
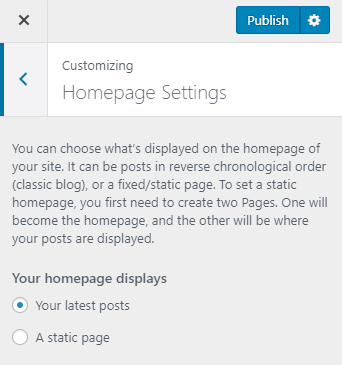
The homepage of your blog could either be a specially created static page or a list of your recent posts. The choice is completely up to your taste. A custom pre-made page looks more professional, but a page with a recent posts listing allows the visitor to see the freshest articles right after entering your blog. Both variants are widely used by popular blogs, so you can choose the one you like most.
Additional CSS
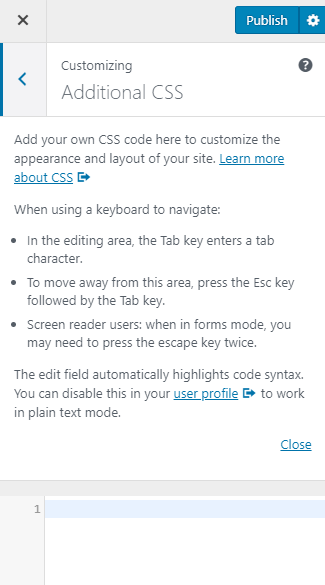
Sometimes pre-made functions are just not enough for blog customization and you need to add some custom code. This tab is just for that purpose—to add some separately written .css code to the page or post. The situation here is the same as with the “Editor” item of Appearance dashboard menu tab—use it only if you are absolutely sure about what you are doing. Changing the code could affect the design and functionalities badly, so don’t forget to make a backup before adding a custom .css.
Conclusion
In this short article, I’ve described all the appearance customization options available for you in WordPress. You now know where all the options are and can start your blog customization. I’m sure you have a perfect taste and will create a blog that millions of readers admire. The road to fame starts here.
Don’t miss out these all-time favourites
- The best hosting for a WordPress website. Tap our link to get the best price on the market with 82% off. If HostPapa didn’t impress you check out other alternatives.
- Website Installation service - to get your template up and running within just 6 hours without hassle. No minute is wasted and the work is going.
- ONE Membership - to download unlimited number of WordPress themes, plugins, ppt and other products within one license. Since bigger is always better.
- Ready-to-Use Website service is the ultimate solution that includes full template installation & configuration, content integration, implementation of must-have plugins, security features and Extended on-page SEO optimization. A team of developers will do all the work for you.
- Must-Have WordPress Plugins - to get the most essential plugins for your website in one bundle. All plugins will be installed, activated and checked for proper functioning.
- Finest Stock Images for Websites - to create amazing visuals. You’ll get access to Depositphotos.com to choose 15 images with unlimited topic and size selection.
- SSL Certificate Creation service - to get the absolute trust of your website visitors. Comodo Certificate is the most reliable https protocol that ensures users data safety against cyber attacks.
- Website speed optimization service - to increase UX of your site and get a better Google PageSpeed score.

A passionate WordPress monster since 2018. Loves professionally built website templates, is Elementor Page Builder fan and becomes extremely curious when it comes to trying some new site creation tools. Quora account
Get more to your email
Subscribe to our newsletter and access exclusive content and offers available only to MonsterPost subscribers.

Leave a Reply
You must be logged in to post a comment.