Developing a Basic WordPress Plugin Using Shortcodes
I have seen a lot of great tutorials centered around building unique WordPress plugins. Unfortunately many of these ideas are fairly complicated or still require external PHP function calls. Also many of the simpler ideas can simply be copied into your theme functions which will save a lot of time.
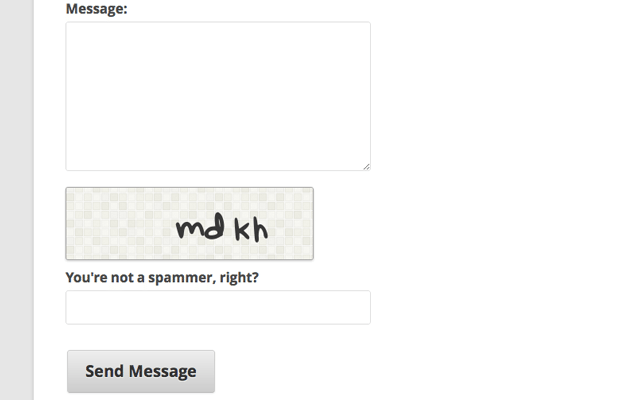
But for this tutorial I want to focus on building a plugin using shortcodes. My example will be an e-mail contact form using CAPTCHA for spam protection. We simply install the plugin codes and then add the small shortcode tag [tmcontact] onto any page. This will instantly append the simple contact form into your WordPress content.
Building a Simple Template
When getting started we are going to make the plugin's main directory which is called shortcodes-contact. Inside I have placed a CSS file, along with some images and a unique TTF font which is used in generating the CAPTCHA. All of these resources pertain specifically to this tutorial so you will not always need custom styles or images. But keep in mind that it is a good idea to store all these resources in your own folder, just in case.
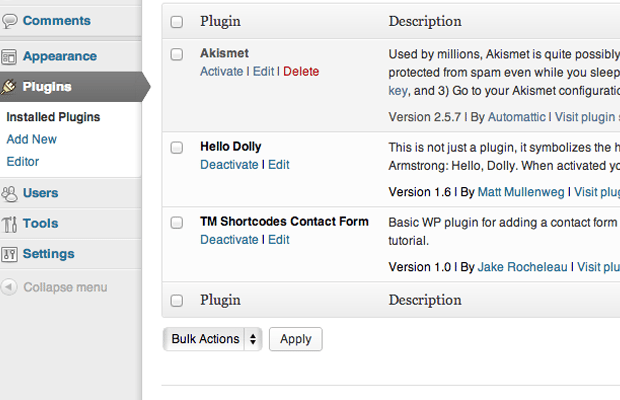
Now we need to create the main plugin file which has the same name as its containing folder. This will be called shortcodes-contact.php and the very first lines of code must delineate some meta information. WordPress will scan the top comments and display this information on the plugin admin menu page. Here is my sample code:
1 2 3 4 5 6 7 8 9 | /*
Plugin Name: TM Shortcodes Contact Form
Plugin URI: http://blog.templatemonster.com/
Description: Basic WP plugin for adding a contact form using shortcodes in Wordpress. Original source from Template Monster Blog to be used in a demo tutorial.
Version: 1.0
Author: Jake Rocheleau
Author URI: http://byjakewithlove.com/
License: Free(no license)
*/ |
You should try to fill out all of these areas wherever possible. Also remember that this needs to come at the very top of the document so WordPress has the information readily available. Now the other part of this header is generating a special type of variable known as a constant. This value will never change throughout the entire execution of our script. My set includes four variables related to our current plugin environment.
1 2 3 4 5 6 7 8 9 10 11 | if (!defined('MYPLUGIN_THEME_DIR')) define('MYPLUGIN_THEME_DIR', ABSPATH . 'wp-content/themes/' . get_template()); if (!defined('MYPLUGIN_PLUGIN_NAME')) define('MYPLUGIN_PLUGIN_NAME', trim(dirname(plugin_basename(__FILE__)), '/')); if (!defined('MYPLUGIN_PLUGIN_DIR')) define('MYPLUGIN_PLUGIN_DIR', WP_PLUGIN_DIR . '/' . MYPLUGIN_PLUGIN_NAME); if (!defined('MYPLUGIN_PLUGIN_URL')) define('MYPLUGIN_PLUGIN_URL', WP_PLUGIN_URL . '/' . MYPLUGIN_PLUGIN_NAME); |
The first constant MYPLUGIN_THEME_DIR will contain the string leading into the current theme directory. MYPLUGIN_PLUGIN_NAME holds your current plugin's full name. The other two constants are used for different purposes within PHP. MYPLUGIN_PLUGIN_DIR is coded in unix formatting which takes the absolute directory from the server root. Meanwhile MYPLUGIN_PLUGIN_URL creates an HTTP URL string which you may include directly into HTML for linking stylesheets or images into the page.
Define a Shortcode
In this same PHP file we are now going to generate our main function which outputs the form onto the page. Shortcodes are able to take user attributes and manage these values, however I have tried to keep this tutorial more focused on the basics. We can see my example function codes below:
1 2 3 4 5 6 7 8 9 10 11 12 13 14 15 16 17 18 19 20 21 22 23 24 25 26 27 28 29 30 31 32 33 34 35 36 | add_shortcode('tmcontact', 'tm_instant_contact_form'); function tm_instant_contact_form($atts) { global $deliveryemail; $email = $deliveryemail; $content = ' <form id="icontactform" name="icontact" method="post" action="'.MYPLUGIN_PLUGIN_URL.'/sendmail.php" enctype="multipart/form-data"> <input type="hidden" name="check" value="01"> <label for="name" id="namelabel">Name:</label> <input type="text" name="name" id="name" class="textinput"> <label for="email" id="emailabel">E-mail:</label> <input type="email" name="email" id="email" class="textinput"> <label for="message" id="msglabel">Message:</label> <textarea name="message" id="message" class="msgtextarea"></textarea> <img src="'.MYPLUGIN_PLUGIN_URL.'/captcha.php" id="captchaimg"> <label for="captcha" id="captchalabel">You\'re not a spammer, right?</label> <input type="text" name="captchavalue" id="captchavalue" class="textcaptcha"> <section id="subcontainer"> <input type="submit" name="submitlink" id="submitlink" class="btn" value="Send Message"> </section> </form> '; return $content; } |
This almost finishes up all the codes inside our main PHP file. The method for adding a new shortcode will look for the text [tmcontact] and when found, will execute our new function tm_instant_contact_form(). I have passed in the attributes parameter although we will not be using it. This is good general practice in case you decide to extend functionality on an existing plugin at some point in the future.
All of the form content is encapsulated inside a string and we return the value back to the function call. If you decide to use PHP echo or print it will execute these codes before rendering the full page. This means your content will appear above the page, instead of in the same spot as your shortcode tag. Also this last bit of code is used to include our custom stylesheet into the page header.
1 2 3 4 | add_action('wp_head', 'tmn_contact_load_scripts', 0); function tmn_contact_load_scripts() { wp_enqueue_style('tmcontact-styles', MYPLUGIN_PLUGIN_URL.'/css/tmcontact.css', false, '1.0'); } |
Generating a CAPTCHA Code
If you noticed in the output HTML the image code we are using links to an internal file named captcha.php. Inside here we are using more fancy PHP methods to generate a unique string of characters, and then embed them on top of an image using the custom TTF font file.
1 2 3 4 5 6 7 8 9 10 11 12 13 | session_start(); $im = imagecreatefrompng("./images/captcha.png"); $chars = array('a', 'b', 'c', 'd', 'e', 'f', 'g', 'h', 'j', 'k', 'm', 'n', 'p', 'q', 'r', 't', 'v', 'w', 'x', 'y', 'z'); $str1 = $chars[mt_rand(0, count($chars)-1)]; $str2 = $chars[mt_rand(0, count($chars)-1)]; $str3 = $chars[mt_rand(0, count($chars)-1)]; $str4 = $chars[mt_rand(0, count($chars)-1)]; $font = "font/ordinaryartichoke.ttf"; $size = mt_rand(40, 44); $_SESSION['captcha'] = $str1.$str2.$str3.$str4; |
Keep in mind that this part of the code probably doesn't require memorization. I just want to point out how I have organized my resources for this plugin, and how you may want to handle something in a related situation. All of the content we need is generated from within the plugin directory, but can be accessed from any page thanks to our PHP constants.
Also we can affect the session variables by setting this CAPTCHA code into the current session. Each user will be given a different randomized code after they refresh the contact page. This can work because PHP has the ability to change header information with any document. We could claim that any PHP file is outputting HTML, JavaScript, or even a PNG image.
1 2 3 4 | // Output the image header("Content-type: image/png"); imagepng($im); imagedestroy($im); |
Again this code isn't absolutely necessary to understand - but it is nice to see how this plugin really works. The last bit of code we should go over is the only part of the code you will need to edit before receiving e-mails. This is also the final PHP document which loads after submitting the form.
Sending Messages in PHP
I have created a new script sendmail.php which handles all of the error checking and e-mailing. One of the variables in this file handles which e-mail address will get the delivered messages. You will want to update this file before installing the plugin so that you can actually receive the emails you are getting.
1 2 3 4 5 6 7 8 9 | session_start(); include_once('../../../wp-load.php' ); $to = "[email protected]"; // edit this line to your own address $subject = "New Contact Form Message"; // edit this line for your message subjects $userval = strtolower(trim($_POST['captchavalue'])); $thecapt = strtolower($_SESSION['captcha']); |
The variable I am referencing is called $to which has a nonsense email set by default. Also the $subject variable underneath may be updated to whatever you want to email subject to read. There are many more options you may think to customize but I feel this plugin offers a learning ground for new developers. It does not require as much time and practice as you'd think to really dig deep into PHP.
So with all this said you should now try to install the plugin! All you need to do is upload the entire shortcodes-contact folder into your /wp-content/plugins/ directory. Then it will appear as deactivated in your Admin panel. Once you activate the plugin all you will need to do is find a page or blog post and include the shortcode [tmcontact] somewhere in the content. Easy to configure and very portable for easy installation on multiple websites.
Final Thoughts
Building your own WordPress plugin will be challenging if you are not familiar with PHP. The backend is literally built on functions and classes all connected via the WordPress core. Although many of these ideas may be confusing at first, keep practicing until you can master the art of coding plugins.
This tutorial has looked into some of the more basic ideas but it is also a completely working system plugin. It may not be the most elegant solution - but you can see how easy it is to expand off my existing code to build your own customized version. Please feel free to download a copy and toy around with it on your own site. Additionally you may leave any comments or questions in the post discussion area below.
Don’t miss out these all-time favourites
- The best hosting for a WordPress website. Tap our link to get the best price on the market with 82% off. If HostPapa didn’t impress you check out other alternatives.
- Website Installation service - to get your template up and running within just 6 hours without hassle. No minute is wasted and the work is going.
- ONE Membership - to download unlimited number of WordPress themes, plugins, ppt and other products within one license. Since bigger is always better.
- Ready-to-Use Website service is the ultimate solution that includes full template installation & configuration, content integration, implementation of must-have plugins, security features and Extended on-page SEO optimization. A team of developers will do all the work for you.
- Must-Have WordPress Plugins - to get the most essential plugins for your website in one bundle. All plugins will be installed, activated and checked for proper functioning.
- Finest Stock Images for Websites - to create amazing visuals. You’ll get access to Depositphotos.com to choose 15 images with unlimited topic and size selection.
- SSL Certificate Creation service - to get the absolute trust of your website visitors. Comodo Certificate is the most reliable https protocol that ensures users data safety against cyber attacks.
- Website speed optimization service - to increase UX of your site and get a better Google PageSpeed score.

First it was design, then writing, and now affiliate marketing. Over a period of 6-7 years he wrote a lot of content for many websites. You can reach Jake on Twitter.
Get more to your email
Subscribe to our newsletter and access exclusive content and offers available only to MonsterPost subscribers.

Leave a Reply
You must be logged in to post a comment.