Code a Path-Style Flyout Navigation Wheel Menu
Anyone who has used the mobile application Path likely knows about their menu interface. It consists of a small circle in the corner which opens to reveal a small number of alternative links. Originally this UI was designed for the iPhone but has since expanded into the realm of mobile apps and website layouts.
For this tutorial I want to demonstrate how we can build a Path-style animated flyout menu using the Wheel Menu jQuery plugin. This plugin is free and open source where you may edit the codes to run as you need. It works great in all modern browsers and this may be a solution to web developers creating mobile web applications in HTML5/CSS3. Take a peek at my live demos to get an idea of what we are building.
Click Demo - Hover Demo - Download Source Code
Getting Started
I will be creating two different HTML files for this demo to showcase both styles of the plugin. You can have the links appear once the user hovers on top of the menu div, or make the user click to show/hide the links. Both options can work but the click-to-show method would seem to run much smoother on mobile devices.
The first step is to download a copy of the plugin codes right from Github. This will include a number of files but we only need to copy jquery.wheelmenu.min.js and wheelmenu.css into the folders /js/ and /css/, respectively. I will also download a local copy of jQuery to add as a dependency for the plugin.
1 2 3 4 5 6 7 8 9 10 11 12 13 14 15 | <!doctype html> <html lang="en-US"> <head> <meta charset="utf-8"> <meta http-equiv="Content-Type" content="text/html"> <title>Path-Style Wheel Menu Demo</title> <meta name="author" content="Jake Rocheleau"> <link rel="shortcut icon" href="http://images.templatemonster.com/images/favicon.ico"> <link rel="icon" href="http://images.templatemonster.com/images/favicon.ico"> <link rel="stylesheet" type="text/css" media="all" href="css/styles.css"> <link rel="stylesheet" type="text/css" media="all" href="css/wheelmenu.css"> <link rel="stylesheet" type="text/css" media="all" href="css/font-awesome.min.css"> <script type="text/javascript" src="js/jquery-1.10.2.min.js"></script> <script type="text/javascript" src="js/jquery.wheelmenu.min.js"></script> </head> |
You will notice I also have a file named font-awesome.min.css added into the document header. Icon fonts are very popular nowadays and this is a great solution for designing really simple navigation links. I've chosen to include Font Awesome which is also open source - but there are many other alternatives. When downloading and copying over this CSS file make sure to also copy the /font/ directory where your CSS can locate these files.
Page Structure
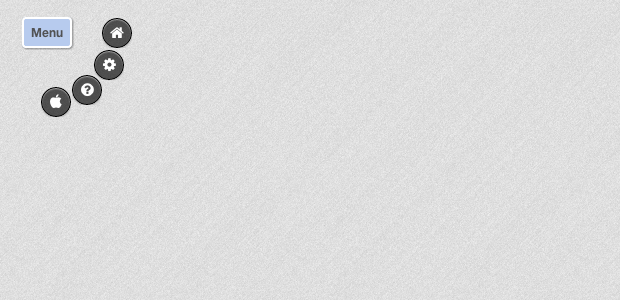
The internal menu page structure is very straightforward. We need to create a link button which can be styled in any manner, but it is used for targeting the Path menu. Once the user hovers or clicks this link it will activate the menu links inside. This is contained inside a div #topmenu which could even be in a fixed position to scroll with the page.
1 2 3 4 5 6 7 8 9 10 11 | <div id="topmenu"> <a href="#mainwheel" class="wheel-button ne"> <span>Menu</span> </a> <ul id="mainwheel" class="wheel"> <li class="item"><a href="#home"><i class="icon-home icon-large"></i></a></li> <li class="item"><a href="#settings"><i class="icon-cog icon-large"></i></a></li> <li class="item"><a href="#faq"><i class="icon-question-sign icon-large"></i></a></li> <li class="item"><a href="#apple"><i class="icon-apple icon-large"></i></a></li> </ul> </div><!-- @end #topmenu --> |
The unordered list #mainwheel contains all of the links we need. These do not go anywhere in my demo but you should point them towards your inner pages or dynamic elements. I am using small icons attached to inner <i></i> elements using Font Awesome classes. It helps to keep the buttons small yet still easy to understand. If you can turn these icons into text it might be easier for visitors to navigate pages.
Design Styles
I did not customize too many pieces of the default wheel menu stylesheet. It comes very bare with only the required display aspects, so you would normally have to re-create the demo styles. Here is what the wheel menu stylesheet will contain:
1 2 3 4 5 6 7 8 9 10 11 12 13 14 15 16 17 18 19 20 21 22 23 24 25 26 27 28 29 30 31 32 33 34 35 36 37 38 39 40 41 42 43 44 45 46 47 48 49 50 51 52 53 54 55 56 57 58 59 60 61 62 63 | /* Required Stylesheets */ .wheel-button { position: relative; } .wheel { margin: 0; padding: 0; list-style: none; width: 200px; /* this will determine the diameter of the circle */ height: 200px; /* this will determine the diameter of the circle */ visibility: hidden; position: relative; display: none; font-size: 1.1em; } .wheel li { overflow: hidden; float: left; } .wheel li a { display: block; } If you would rather keep this in your own stylesheet to consolidate everything, that wouldn't be a bad choice. My styles.css file has a list of document resets along with positioning for the link elements. When looking at the online demo from Github you will recognize the link buttons have been designed to mirror the original Path menu. /* custom wheel design */ .wheel-button { padding: 6px 7px; font-size: 1.2em; font-weight: bold; color: #515254; text-decoration: none; background: #b7cbee; border: 2px solid #fff; -webkit-box-shadow: 1px 1px 2px rgba(0,0,0,0.4); -moz-box-shadow: 1px 1px 2px rgba(0,0,0,0.4); box-shadow: 1px 1px 2px rgba(0,0,0,0.4); -webkit-border-radius: 4px; -moz-border-radius: 4px; border-radius: 4px; } .wheel li a { background: rgba(0,0,0,0.65); border-radius: 30px; font-weight: bold; padding: 7px 4px; text-align: center; text-decoration: none; width: 30px; height: 30px; color: #fff; border: 1px solid #000; box-shadow: 0 1px 2px rgba(0,0,0,0.25), inset 0 1px 1px rgba(255,255,255,0.5); -moz-box-shadow: 0 1px 2px rgba(0,0,0,0.25), inset 0 1px 1px rgba(255,255,255,0.5); -webkit-box-shadow: 0 1px 2px rgba(0,0,0,0.25), inset 0 1px 1px rgba(255,255,255,0.5); -moz-transition: all 0.25s ease; -webkit-transition: all 0.25s ease; -o-transition: all 0.25s ease; transition: all 0.25s ease; } |
I duplicated these over into my own stylesheet but you can always edit them to your choosing. Remember that you can also use full text labels instead of icons if that would make navigation easier. The Path menu was designed for smartphones, and so for mobile webapps the icon links often work best. Try out both label styles and see what ultimately feels the most intuitive.
Wheel Menu in jQuery
Down towards the bottom of the page I have opened a script tag for the jQuery codes. We simply attach a function call onto the .wheel-button class. This anchor link already points towards the internal menu, so the plugin will handle everything else.
1 2 3 4 5 6 7 8 9 10 | $(function(){ $(".wheel-button").wheelmenu({ trigger: "click", animation: "fly", animationSpeed: "fast", angle: "SE" }).on('click', function(e){ e.preventDefault(); }); }); |
Notice there are some options that I have kept so that we know how to update the default choices. These are all the main parameters and you can find more detailed documentation from the plugin's Github repo.
The trigger parameter will obviously check if the menu displays on click or on hover. My two demos differentiate between these effects so you'll be able to see how they feel in action. The animation parameter can either be "fade" or "fly" which I have also updated between my two demos. animationSpeed should also be pretty straightforward with choices between "instant", "fast", "medium", or "slow".
The angle value has a lot of values which pinpoint the exact location where your menu links display. In my example we have them coming down into the South-East corner which naturally fits into the menu position. Depending on where you place the anchor link you will want to update this value accordingly.
Now the last bit of code after closing the function call will attach another event handler. This is called "chaining" and it's fairly common within jQuery development. I am using the .on() method to check for click events onto the menu button. It will stop the HREF value from loading so we don't get the page jump effect every time when opening the navigation. If we removed all the internal content our single jQuery declaration can look like $(".wheel-button").wheelmenu().on().
Click Demo - Hover Demo - Download Source Code
Closing
I haven't used Path very much but the application has always stood out. Notably the user interface and the textured navbar designs really allure users into the product. This flyout menu tutorial is just another thing to distinguish mobile app from others. I hope this tutorial may prove useful to developers looking to create any type of website or mobile web design. Additionally if you have questions or thoughts on the tutorial feel free to share with us in the post discussion area below.

First it was design, then writing, and now affiliate marketing. Over a period of 6-7 years he wrote a lot of content for many websites. You can reach Jake on Twitter.
Get more to your email
Subscribe to our newsletter and access exclusive content and offers available only to MonsterPost subscribers.

Leave a Reply
You must be logged in to post a comment.