Dynamic Password Generation & Rating with jQuery. Tutorial
Signup forms are often a common piece to websites these days. Gaining registered users can be helpful to blogs, webapps, social networks, and dozens of other types of websites.
Dynamic jQuery effects have allowed for a more self-encompassing experience where users are practically guided through the process. One of these stages requires picking a unique password which is complex enough to ward off brute-force hackers.
For this tutorial I want to demonstrate the power of an open source jQuery plugin named Passy. It comes with two main functions which allow password generation and testing for complexity. There are a long list of custom parameters you may include to check length, character types, capitalization, and other similar traits. But Passy may be used even without coding a slew of your own custom settings. Take a peek at my sample demo and feel free to download a copy of my codes as well.
Live Demo - Download Source Code
Creating the Page
First we need to setup the main HTML file and download a copy of the Passy plugin. This requires only a single JS file along with a copy of the latest jQuery library. Grab a copy of Passy from the official Github repo which is actually pretty small. The zip archive itself only contains a single JS file along with the readme info.
1 2 3 4 5 6 7 8 9 10 11 12 13 | <!doctype html> <html lang="en-US"> <head> <meta charset="utf-8"> <meta http-equiv="Content-Type" content="text/html"> <title>Dynamic Password Generation & Rating Demo</title> <meta name="author" content="Jake Rocheleau"> <link rel="shortcut icon" href="https://www.templatemonster.com/favicon.ico"> <link rel="icon" href="https://www.templatemonster.com/favicon.ico"> <link rel="stylesheet" type="text/css" media="all" href="css/styles.css"> <script type="text/javascript" src="js/jquery-1.10.2.min.js"></script> <script type="text/javascript" src="js/jquery-passy.js"></script> </head> |
All of the design styles are written into the custom jQuery code which we need to append into the bottom of this main HTML file. The plugin JS code is easy to understand but really doesn't require any customization. I've also added my own stylesheet which is used to shape the overall page design.
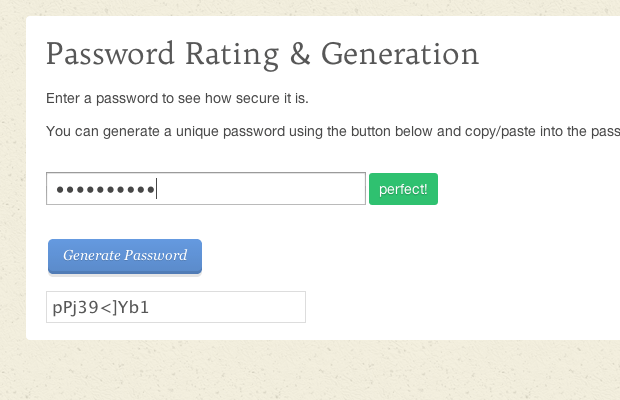
1 2 3 4 5 6 7 8 | <div id="someform"> <input type="password" name="password" id="input" class="basictxt" placeholder="Type your password"> <span id="output">...</span> </div> <a href="#" id="generate" class="btn">Generate Password</a> <input type="text" id="generatedpw"> |
There isn't a strict method to encapsulate this HTML within the page body. In order to generate a password you will need to target an input field, because this is appended into the value attribute. The only other method would be to apply the generation onto a hidden input which then copies over the password into HTML. A bit more convoluted, but it may be useful if you need something other than a single form input for PW generation.
At the top of the page we have a typical password input with another span element located to the side. This span is targeted using the ID #output which is the same as in the live Passy demo.
Design Styles
There are some really great custom design styles included within my sample demo. You can check out my styles.css stylesheet to see many of the various resets I have included. Notably I have included a single Google Web Font using the @import statement.
1 2 3 4 5 6 7 8 9 10 11 12 13 14 15 16 17 18 19 20 21 22 23 24 25 26 27 28 29 30 31 32 33 34 35 36 37 38 | .btn { display: inline-block; margin: 2px; padding: 0px 15px 3px; background-image: -webkit-linear-gradient(top, rgba(0,0,0,0), rgba(0,0,0,0.1)); background-image: -moz-linear-gradient(top, rgba(0,0,0,0), rgba(0,0,0,0.1)); background-image: -ms-linear-gradient(top, rgba(0,0,0,0), rgba(0,0,0,0.1)); background-image: -o-linear-gradient(top, rgba(0,0,0,0), rgba(0,0,0,0.1)); background-image: linear-gradient(top, rgba(0,0,0,0), rgba(0,0,0,0.1)); background-color: #659ae0; vertical-align: middle; font: italic 14px/32px Georgia,Serif; text-align: center; color: #fff; text-decoration: none; text-shadow: 0px 1px 0px rgba(0,0,0,0.15); -webkit-box-shadow: inset 0px -3px 0px rgba(0,0,0,0.1), 0px 3px 0px rgba(0,0,0,0.1); -moz-box-shadow: inset 0px -3px 0px rgba(0,0,0,0.1), 0px 3px 0px rgba(0,0,0,0.1); box-shadow: inset 0px -3px 0px rgba(0,0,0,0.1), 0px 3px 0px rgba(0,0,0,0.1); -webkit-border-radius: 5px; -moz-border-radius: 5px; border-radius: 5px; } .btn:hover { color: #fff; background-image: -webkit-linear-gradient(top, rgba(0,0,0,0.05), rgba(0,0,0,0.2)); background-image: -moz-linear-gradient(top, rgba(0,0,0,0.05), rgba(0,0,0,0.2)); background-image: -ms-linear-gradient(top, rgba(0,0,0,0.05), rgba(0,0,0,0.2)); background-image: -o-linear-gradient(top, rgba(0,0,0,0.05), rgba(0,0,0,0.2)); background-image: linear-gradient(top, rgba(0,0,0,0.05), rgba(0,0,0,0.2)); } .btn:active{ position: relative; top: 2px; -webkit-box-shadow: inset 0px -1px 0px rgba(0,0,0,0.1), 0px 2px 0px rgba(0,0,0,0.1); -moz-box-shadow: inset 0px -1px 0px rgba(0,0,0,0.1), 0px 2px 0px rgba(0,0,0,0.1); box-shadow: inset 0px -1px 0px rgba(0,0,0,0.1), 0px 2px 0px rgba(0,0,0,0.1); } |
The large blue button was designed by Stephan Rusu using Codepen. His codes also include duplicates from the old Firefox design which had black and green buttons, too. This can be an easy method to incorporate beautiful colorful buttons into any layout.
1 2 3 4 5 6 7 8 9 10 11 12 13 14 15 16 17 18 19 20 21 22 23 24 25 26 27 28 29 30 31 32 33 34 35 36 37 38 39 40 41 42 43 44 45 | /* page structure */ #w { display: block; width: 800px; margin: 0 auto; background: #fff; padding: 15px 20px; -webkit-border-radius: 4px; -moz-border-radius: 4px; border-radius: 4px; } #someform { display: block; margin-bottom: 30px; } .basictxt { padding: 4px 7px; color: #474747; font-size: 1.75em; width: 320px; } #generatedpw { display: block; margin-top: 15px; border: 1px solid #ddd; padding: 5px; width: 260px; color: #575757; font-size: 1.7em; } #output { position: relative; top: -1px; padding: 8px 10px; font-size: 1.4em; color: #fff; text-shadow: 0px 1px 1px rgba(0,0,0,0.25); -webkit-border-radius: 3px; -moz-border-radius: 3px; border-radius: 3px; } |
At the very bottom of my stylesheet we can find all the page contents. These styles include the main wrapping div along with various form elements. The actual rating of the password is handled using jQuery, so that is a bit easier to customize. Either way it just takes some patience and a little elbow grease to setup a very similar website design.
Developing with jQuery
Finally the last piece to this plugin is setting up all the default functions. The demo sample code is based around one of the easiest methods without specifying your own patterns for the password requirements. I want to break down each section into smaller pieces which makes the jQuery much easier to comprehend.
1 2 3 4 5 | var $input = $('#input'); var $output = $('#output'); var $generate = $('#generatedpw'); $.passy.requirements.length.min = 5; |
These first few lines setup variables for targeting elements on the page. $input is the regular password field while $output is the contextual rating. Now $generate is another input field located at the bottom of the page. It takes a dynamically generated password and displays this in regular text for the visitor to copy/paste and use as their own password.
The $.passy.requirements object contains a lot of different properties we can manipulate. This demo only requires that a password be longer than 5 characters.
1 2 3 4 5 6 7 8 9 10 11 12 | var feedback = [ {color: '#d0a14f', text: 'weak'}, {color: '#4fb9d0', text: 'okay'}, {color: '#4fd098', text: 'good'}, {color: '#2fc170', text: 'perfect!'} ]; // setup the passy() function on each input $input.passy(function(strength, valid) { $output.text(feedback[strength].text); $output.css('background-color', feedback[strength].color); }); |
Feedback is a custom array which holds objects of varying complexity. The password rating mechanism uses these arrays to display the level of a password string. You are allowed to customize the color and other styles as needed, but each of the 4 levels will remain constant since they are built into the plugin source code.
The second block of code is targeting our input field which is running the passy() function. We check every time a new character is typed into the field to update the validity of the current string. All we do is update the internal text and background color for the $output element. You can even make up your own properties for each level and access them by using syntax like feedback[strength].nameofproperty.
1 2 3 4 5 | // unique password generation $('#generate').on('click', function(e) { e.preventDefault(); $generate.passy('generate', 10); }); |
This final block of code generates a unique customized password and places it into the $generate input field. Calling passy() with the generate parameter means we are expecting a different method call from the plugin. My secondary parameter is a number which indicates length of the new password. If you want to research these methods a little further check out the online plugin documentation.
Live Demo - Download Source Code
Closing
Passy is one of my personal recommendations for setting up dynamic registration forms. You can't go wrong with a password complexity checker to give users a piece of mind. It can also help people decide when choosing a password if it meets your website's expectations. Definitely feel free to download a copy of my project source codes and see how you could implement this plugin within your own web projects.

First it was design, then writing, and now affiliate marketing. Over a period of 6-7 years he wrote a lot of content for many websites. You can reach Jake on Twitter.
Get more to your email
Subscribe to our newsletter and access exclusive content and offers available only to MonsterPost subscribers.

Leave a Reply
You must be logged in to post a comment.